I found some problems with arrow keys, insert/delete, pg up/pg down and home/end keys with vmware 6.5. When I press these keys, my Windows opens the Start Menu. So I always have to use the keypad's arrow keys. -_-..
Actually the solution is very simply, close the vmware and create a config file in ~/.vmware directory (gedit ~/.vmware/config)
and add this:-
xkeymap.keycode.108 = 0x138 # Alt_R
xkeymap.keycode.106 = 0x135 # KP_Divide
xkeymap.keycode.104 = 0x11c # KP_Enter
xkeymap.keycode.111 = 0x148 # Up
xkeymap.keycode.116 = 0x150 # Down
xkeymap.keycode.113 = 0x14b # Left
xkeymap.keycode.114 = 0x14d # Right
xkeymap.keycode.105 = 0x11d # Control_R
xkeymap.keycode.118 = 0x152 # Insert
xkeymap.keycode.119 = 0x153 # Delete
xkeymap.keycode.110 = 0x147 # Home
xkeymap.keycode.115 = 0x14f # End
xkeymap.keycode.112 = 0x149 # Prior
xkeymap.keycode.117 = 0x151 # Next
xkeymap.keycode.78 = 0x46 # Scroll_Lock
xkeymap.keycode.127 = 0x100 # Pause
xkeymap.keycode.133 = 0x15b # Meta_L
xkeymap.keycode.134 = 0x15c # Meta_R
xkeymap.keycode.135 = 0x15d # Menu
Sunday, December 28, 2008
Friday, December 26, 2008
Reinstall Ubuntu...
My Ubuntu having big trouble! CPU usage too high... totally don't know what happen. The system monitor showing the CPU usages very high... 50%~100%. After rebooting few time, eventhough my system is apparently idle (only running the system monitor) the CPU usage still very high. The Compiz effect is lagging (switching the 3D desktop). Strange thing is all the processes showing in system monitor is very low. Totally can't find any process that cause this problem.
Okay... let me recall what had I done...
1. Install MPlayer and its codec.
2. Installed Compiz fusion Icon.
3. Installed Apache2, MySQL and php.
4. Live update via Update Manager.
5. Installed VirtualBox and modify the /etc/init.d/mountdevsubfs.sh
Everything seen fine for me. I don't think these applications or services were too heavy for my quad core processor. Could it be the updates crashed with something? Really no idea.
It's time to find the answer from the www. Surprisingly there are some report of this bugs (Try google with the keyword "ubuntu cpu usage"). After reading few article, I learnt something new... Zombie Process! OMG... my system got zombie!!!
What is the zombie process? Go read the wikipedia... http://en.wikipedia.org/wiki/Zombie_process
How to see the zombie? The simple way is use the top command in the terminal.

Notice the second line, "Tasks: 165 total, .... ... ... ... 1 zombie". To find that zombie process, just run the system monitor, click on the Processes tab and look for "Zombie" in the status column. The other way is the command "ps aux" in the terminal.
Anyway, I still don't know how to solve the high load problem. So I decided to reinstall my Ubuntu. Then monitor the CPU usage each time I install an application or update.

OK, just after the installation, without any updating, seen fine, although the CPU4 showing 46.7% but I think its normal.
Then I tried to install Compiz and I moved the "Add/Remove Application" window around while installing.

OMG, see that graph of the CPU History? A downloading process plus moving window task only... I really don't understand why so heavy load? hmm... Never mind, just continue the updating... after everything done (all the updates including NVidia driver and Compiz), I restart the Ubuntu. And here is the result:-

Seen OK. All Compiz effect very smooth. Well... I guess this CPU high load problem need some time to figure out. Ubuntu (linux) is still like an alien to me. ):=|
EDIT: I just found a program that will cause the 100% CPU usage problem! The openOffice!!! Just after I published this article, I closed the openOffice and immediately I switched to another desktop and closed the GIMP. And bingo, guess what, 100% CPU usage:-

System monitor shows that 4 CPU 100%, top shows that 99.6%us, soffice.bin: 392%. But strange thing is the Compiz still running smoothly!? Anyway, this problem I still can solve it, just kill the soffice.bin process. Then CPU back to normal again.

Conclusion, need more time to understand this alien.
Thursday, December 25, 2008
VirtualBox 2.1 in Ubuntu
VirtualBox finally support Accelerated 3D Graphics via OpenGL. The latest released on the 17th December 2008, version, 2.1.0, has a lot new features. See the changelog for more information. Must try it~
Basically the interface is about the same like previous version.

But there is a little problem with the USB. When I want to do come configuration, an error popup:-

Well, this problem can be easily solve, VirtualBox FAQ has the answer.
After that I try to enable the 3D Acceleration.

No error.... OK then lets install a Windows XP pro and see.

No Direct3D acceleration support. But the OpenGL screen saver work fine. I didn't try any 3D game that support OpenGL yet. (Recently busy with my project) So...
Basically the interface is about the same like previous version.

But there is a little problem with the USB. When I want to do come configuration, an error popup:-

Well, this problem can be easily solve, VirtualBox FAQ has the answer.
USB on Ubuntu/Intrepid:-
Add these lines to at the end of the start() function of /etc/init.d/mountdevsubfs.sh. (before the } )
mkdir -p /dev/bus/usb/.usbfs
domount usbfs "" /dev/bus/usb/.usbfs usbfs -obusmode=0700,devmode=0600,listmode=0644
ln -s .usbfs/devices /dev/bus/usb/devices
mount --rbind /dev/bus/usb /proc/bus/usb
After that I try to enable the 3D Acceleration.

No error.... OK then lets install a Windows XP pro and see.

No Direct3D acceleration support. But the OpenGL screen saver work fine. I didn't try any 3D game that support OpenGL yet. (Recently busy with my project) So...
to be continue ...
Tuesday, December 23, 2008
Playing Movie in Ubuntu
Ubuntu default player is Totem Movie Player, however it only can support few video/audio format such as AVI and MP3 by default installation. To make it support more format, open then Package Manager, click the Sound and Video category, search the key word GStreamer. Tick all the GStreamer plugins and install them. Then you can play almost all kind of video with Totem Movie Player except RMVB/RM (Real alternative).

To play RMVB/RM format, I found one video player which as these codecs. The MPlayer. First of all, use the Package Manager to install the MPlayer Movie Player. Then download and MPlayer Binary Codec Packages. Extract them...
command for 32bit user:-
tar xvjf essential-20071007.tar.bz2
cd essential-20071007
command for 64bit user:-
tar xvjf essential-amd64-20071007.tar.bz2
cd essential-amd64-20071007
and copy them into /usr/lib/codecs. If /usr/lib/codecs directory does not exist then create it.
sudo mkdir /usr/lib/codecs
sudo cp * /usr/lib/codecs
NOTE: you may need to install libstdc++5 to get .rmvb files to play. Even though it might not be necessary for you, it can’t hurt to install (the package isn’t very big). Run the command: sudo apt-get install libstdc++5 in a Terminal.
Now open the MPlayer (Applications->Sound and Video->MPlayer Movie Player) . Right click in the Mplayer and select Preferences from the menu.

Go to the Video tab, set the Available drivers: xv X11/Xv.

Then at the Codecs & demuxer tab, set the Video codec family to RealVideo decoder and Audio codec family to FFmpeg/libavcodec audio decoders.

Restart your MPlayer, and test play a RMVB/RM file.
Additional information:-
The Flash plugin for Firefox may be overwrite after installed these codecs, so you have to redo the Flash plugin again. (Refer to Installing Flash Player 10 64bit) If you still have the Flash plugin file - libflashplayer.so, then just simply copy it to /usr/lib/mozilla/plugins/ and redo the nspluginwrapper again.
Sample code:-
sudo cp libflashplayer.so /usr/lib/mozilla/plugins/
sudo nspluginwrapper -i /usr/lib/mozilla/plugins/libflashplayer.so
sudo ln -sf /usr/lib/nspluginwrapper/plugins/npwrapper.libflashplayer.so /usr/lib/mozilla/plugins/
sudo ln -sf /usr/lib/nspluginwrapper/plugins/npwrapper.libflashplayer.so /usr/lib/firefox-addons/plugins/
Sunday, December 21, 2008
little problem with PhpMyAdmin
When I go to phpMyAdmin page, I notice there is an error message on the bottom "Cannot load mcrypt extension. Please check your PHP configuration".
*Note: Please refer to previous article last picture.
Well, to solve this just install the php-mcrypt then restart apache2.
sudo apt-get install php5-mcrypt
sudo /etc/init.d/apache2 restart
*Note: Please refer to previous article last picture.
Well, to solve this just install the php-mcrypt then restart apache2.
sudo apt-get install php5-mcrypt
sudo /etc/init.d/apache2 restart
Friday, December 12, 2008
LAMP in Ubuntu Desktop
Desktop version of Ubuntu by default doesn't include "AMP" (Apache, MySQL, php), so you have to install them yourself. And I notice that these packages can't use package manager to install. So the only way is use the command in terminal.
1. Apache
Install Apache version 2
sudo apt-get install apache2
Install php as module
sudo apt-get install libapache2-mod-php5
To test the Apache, just open your Firefox, go to http://localhost
if you saw
2. MySQL
Install MySQL server (you will ask to enter a password for the root user during the installation)
sudo apt-get install mysql-server
Install MySQL Administrator (GUI Administrator tools)
sudo apt-get install mysql-admin
Install the php support on MySQL
sudo apt-get install php5-mysql
To test the MySQL, open the Applications->Programming->MySQL Administrator.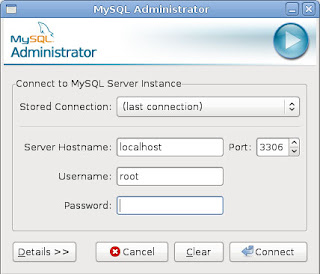 Server Host is localhost, port is 3306, username is root and your password and click connect.
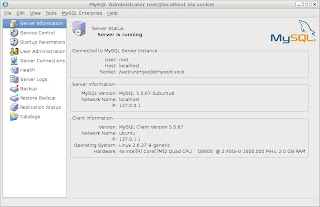 If success you will see this.
3. phpMyAdmin
phpMyAdmin is a powerful web-base MySQL administrator interface.
Download the program from here
http://www.phpmyadmin.net/home_page/downloads.php
The extract it (for English version)
tar -xzvf phpMyAdmin-3.1.1-english.tar.gz
Move it to WWW root folder
sudo mv phpMyAdmin-3.1.1-english /var/www
mv phpMyAdmin-3.1.1-english phpMyAdmin
To test it, open the Firefox and go to http://localhost/phpMyAdmin and you will see something like this
1. Apache
Install Apache version 2
sudo apt-get install apache2
Install php as module
sudo apt-get install libapache2-mod-php5
To test the Apache, just open your Firefox, go to http://localhost
if you saw
It works!
meaning... it works...2. MySQL
Install MySQL server (you will ask to enter a password for the root user during the installation)
sudo apt-get install mysql-server
Install MySQL Administrator (GUI Administrator tools)
sudo apt-get install mysql-admin
Install the php support on MySQL
sudo apt-get install php5-mysql
To test the MySQL, open the Applications->Programming->MySQL Administrator.
 Server Host is localhost, port is 3306, username is root and your password and click connect.
 If success you will see this.
3. phpMyAdmin
phpMyAdmin is a powerful web-base MySQL administrator interface.
Download the program from here
http://www.phpmyadmin.net/home_page/downloads.php
The extract it (for English version)
tar -xzvf phpMyAdmin-3.1.1-english.tar.gz
Move it to WWW root folder
sudo mv phpMyAdmin-3.1.1-english /var/www
mv phpMyAdmin-3.1.1-english phpMyAdmin
To test it, open the Firefox and go to http://localhost/phpMyAdmin and you will see something like this

Wednesday, December 10, 2008
Installing Flash Player 10 64bit
Actually 64bit OS sometimes give a lot trouble, such as driver or plug-in problem, especially Adobe Flash Player and Java Virtual Machine. After I installed 64bit Ubuntu 8.10, everything is fine, I am happy with it, but then I notice that Adobe Flash Player not support 64bit. Damn... can't watch youtube in Firefox anymore. I had tried both automatic and manual install the flash player, but fail. It kept popup an error message. After that I tried some third party flash player plugins, totally BUSTED!
Finally, Adobe release the Flash Player 10 Alpha for 64bit. I quickly download and try to plug it into my Firefox. But fail too! I found a lot howto on the net, the step is simple, but how come kept busted?! (OK.. OK ... I agreed that I am still a noob in Ubuntu :P~ ) Finally, I found one clear, simple, direct, ultimate howto!!!
http://www.myscienceisbetter.info/2008/05/install-adobe-flash-player-10-on-ubuntu-using-nspluginwrapper.html.
*Thanks to Romeo Adrian Cioaba.
I want to highlight one thing first according to the howto:
1. Make sure you don't have any other flash plugin installed on your system:
sudo apt-get remove -y --purge flashplugin-nonfree gnash gnash-common mozilla-plugin-gnash swfdec-mozilla libflashsupport nspluginwrapper
Yes... the reason I fail because I had installed some third party flash plugins and even though I had removed them using the package manager... somehow, I not sure are they fully removed? The command above is quite complete. It did removed all the xxx and yyy flash plugins.
Next step is to double confirm you don't any other flash plugins.
sudo rm -f /usr/lib/mozilla/plugins/*flash*
sudo rm -f ~/.mozilla/plugins/*flash*
sudo rm -f /usr/lib/firefox/plugins/*flash*
sudo rm -rfd /usr/lib/nspluginwrapper
Then get the nspluginwrapper. (*Note: Adobe didn't provide the installation files, in stead, it just release a plugin library file. nspluginwrapper is needed to plug the library file into Firefox)
sudo apt-get install ia32-libs nspluginwrapper
Now you can download the 64bit flash plugin from here:
http://labs.adobe.com/downloads/flashplayer10.html
Extract it to your desktop and then copy to the mozilla plugin folder:
sudo cp libflashplayer.so /usr/lib/mozilla/plugins/
Final step. Use the nspluginwrapper to plug it into Firefox. :)
sudo nspluginwrapper -i /usr/lib/mozilla/plugins/libflashplayer.so
sudo ln -sf /usr/lib/nspluginwrapper/plugins/npwrapper.libflashplayer.so /usr/lib/mozilla/plugins/
sudo ln -sf /usr/lib/nspluginwrapper/plugins/npwrapper.libflashplayer.so /usr/lib/firefox-addons/plugins/
Close and open your Firefox and you can go to youtube now.
Additional information:-
Please take note that some media player has flash plugin bundled with it. I just facing this problem! I installed VLC media player last night, and this morning I found out that my Firefox fail to play flash again.
If this happen, just repeat the whole step again except this:
X sudo rm -rfd /usr/lib/nspluginwrapper
You already installed the nspluginwrapper, so do not remove it and reinstall again!
Tuesday, December 9, 2008
aMSN
I had tried few MSN program and I like aMSN the most. Is just like Windows Live Messenger, you won't feel too strange with it.
 Basically, this is how aMSN looks like. This is the default skin. You can download the skin from their website and change it.
It has drawing plugin too. You can install the plugin at the aMSN menu -> Account->Select Plugins. Select the Inkdraw, the click Load.
 Then you can trigger the drawing now by clicking the Inkdraw button. Too bad it only support black color.
 Basically, this is how aMSN looks like. This is the default skin. You can download the skin from their website and change it.
It has drawing plugin too. You can install the plugin at the aMSN menu -> Account->Select Plugins.
 Select the Inkdraw, the click Load.
 Then you can trigger the drawing now by clicking the Inkdraw button. Too bad it only support black color.
Thursday, December 4, 2008
Setup Chinese Input
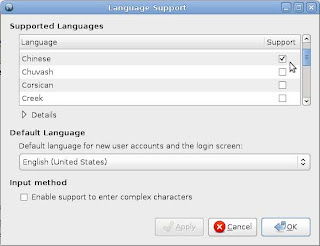
First of all, go to System->Administration->Language support, enabled the Chinese support and click apply. Then it will starting download the files itself.
Next step is to configure the SCIM. Open gedit (Applications->Accessories->Text Editor) and type in these code:
scim -d
export XMODIFIERS=@im=scim
export GTK_IM_MODULE=scim
gnome-session
Save the file as .xsession (make sure it is save under your home directory)
Then open a terminal and type:
sudo chmod +x .xsession
Finally, restart the session and you will see an icon that looks like a keyboard on the system tray bar.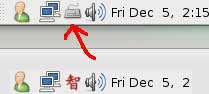 Now you can press ctrl+space to trigger the Chines input. Then the keyboard icon will change to "智" and you will see something like this on the bottom right of your desktop which similarly to other Chinese input program in Windows.
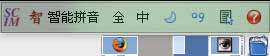
Now you can type 中文 in any application. Have funz~~

Next step is to configure the SCIM. Open gedit (Applications->Accessories->Text Editor) and type in these code:
scim -d
export XMODIFIERS=@im=scim
export GTK_IM_MODULE=scim
gnome-session
Save the file as .xsession (make sure it is save under your home directory)
Then open a terminal and type:
sudo chmod +x .xsession
Finally, restart the session and you will see an icon that looks like a keyboard on the system tray bar.
 Now you can press ctrl+space to trigger the Chines input. Then the keyboard icon will change to "智" and you will see something like this on the bottom right of your desktop which similarly to other Chinese input program in Windows.
Now you can type 中文 in any application. Have funz~~
Wednesday, December 3, 2008
Installing Windows XP in Ubuntu
1. Installing VMWare
I am using VMWare Workstation 6.5.1 because it has more function and easy to use by its GUI interface. Trial version can be download from here. You have to register an account (or login if you have one) in order to download it. Download the Linux bundle (32but or 64bit depending on your Ubuntu). VMWare Workstation 6.5.1 is quite powerful. If you like it you can buy it.
To install it, you can use this command in the terminal,
sudo sh VMware-Workstation-6.5.1-126130.i386.bundle
or this for 64Bit platform.
sudo sh VMware-Workstation-6.5.1-126130.x86_64.bundle
A GUI installation will appear and just follow the instruction given.
2. Creating Windows XP Pro guest
Launch the VMWare Workstation which located in Applications->System Tools. Then click the "Create a new virtual machine". Select "Typical" and next.
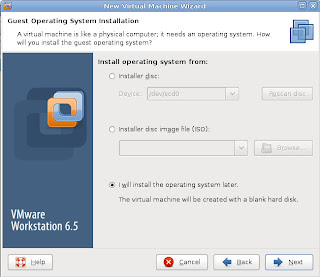 If you want to install your Windows XP from a CD, select "I Will install the operating system later".
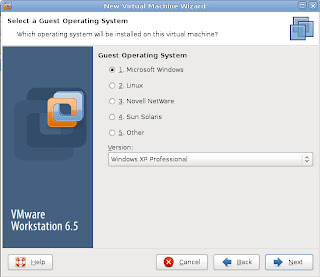 No need to explain for this...
 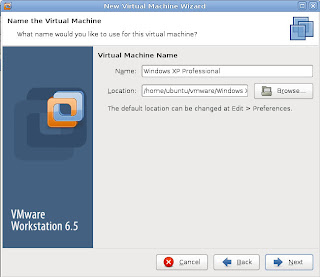 Give a nice name for your virtual machine and set the location of it. Lazy? then just click Next.
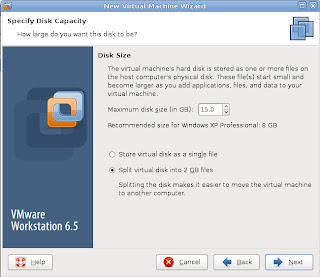 Set the size of your virtual machine's hard disk. Later you can increase your disk size by using the vmware-vdiskmanager command in the terminal, for example:-
vmware-vdiskmanager -x 20GB "vmware/Windows XP Professional/Windows XP Professional.vmdk"
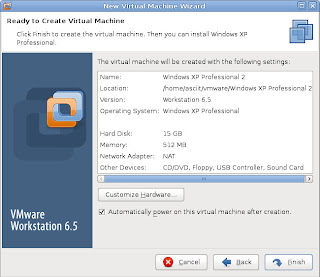 Finally, the summary. If you OK with it, then click Finish. If you want to change some hardware setting, click "Customize Hardware".
3. Hardware Customization
Normally I only customize the Memory, Processors and the Network adapter. The rest, just use default setting.
Finally, insert your Windows' CD and Power On. Then install your Windows... then ... ... ... finish. To install the driver, go to the VMWare's menu VM->Install VMWare Tools. Then focus on your Windows, a program will startup. Just follow the step and everything will be done after the restart. Now you can install the DirectX 9.0c and test it!
I am using VMWare Workstation 6.5.1 because it has more function and easy to use by its GUI interface. Trial version can be download from here. You have to register an account (or login if you have one) in order to download it. Download the Linux bundle (32but or 64bit depending on your Ubuntu). VMWare Workstation 6.5.1 is quite powerful. If you like it you can buy it.
To install it, you can use this command in the terminal,
sudo sh VMware-Workstation-6.5.1-126130.i386.bundle
or this for 64Bit platform.
sudo sh VMware-Workstation-6.5.1-126130.x86_64.bundle
A GUI installation will appear and just follow the instruction given.
2. Creating Windows XP Pro guest
Launch the VMWare Workstation which located in Applications->System Tools. Then click the "Create a new virtual machine".
 Select "Typical" and next.
 If you want to install your Windows XP from a CD, select "I Will install the operating system later".
 No need to explain for this...
  Give a nice name for your virtual machine and set the location of it. Lazy? then just click Next.
 Set the size of your virtual machine's hard disk. Later you can increase your disk size by using the vmware-vdiskmanager command in the terminal, for example:-
vmware-vdiskmanager -x 20GB "vmware/Windows XP Professional/Windows XP Professional.vmdk"
 Finally, the summary. If you OK with it, then click Finish. If you want to change some hardware setting, click "Customize Hardware".
3. Hardware Customization
Normally I only customize the Memory, Processors and the Network adapter. The rest, just use default setting.
- Memory
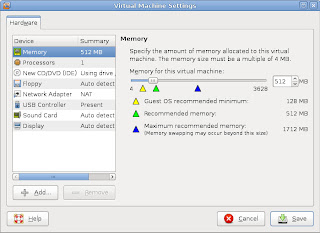

By default is 512MB. You can make it higher if you want to. I had tried running two MMORPG games in XP pro using 512MB RAM, no problem at all. Anyway, this can be change in future.
- Processors


It support 2 processors and the Intel VT-x / AMD-V engine. You can enable if your processor support it. (You can check your processor specification in Intel or AMD website)
- Network Adapter


The easiest way is set to Bridged. Don't think too much. :P~4. Power On
Finally, insert your Windows' CD and Power On. Then install your Windows... then ... ... ... finish. To install the driver, go to the VMWare's menu VM->Install VMWare Tools. Then focus on your Windows, a program will startup. Just follow the step and everything will be done after the restart. Now you can install the DirectX 9.0c and test it!
Tuesday, December 2, 2008
Window's game in Ubuntu
I am using VMWare workstation 6.51 which support the DirectX9c. Installed a Windows XP guest and run a MMORPG game. It works fine! :D~

OOO... wait a minute... I found a little problem with the 3D rendering. The picture below shows that my legs were missing... lol... And I feel little lag if too high resolution or too high quality. Anyway, it is just a starting of 3D in virtualization. I believe it will getting better in future. Well done to VMWare. :)

Warcraft III - Frozen Throne can simply use wine to open it. But unfortunately GGClient can not start with wine.

Monday, December 1, 2008
I'm back!
Yes~ I am back!! With Ubuntu 8.10 64bit now. The graphics driver is solved!!! Ubuntu banzai ~~~ Intrepid Ibex banzai ~~~~
Last few months I was busy with my project, no time to test the 8.10 version. And this blog was suspended too. lol... But starting from today, I will slowly update this blog since the driver problem had solved. Project "Throwing My Windows Away" will be continue! hahahaha!
I installed Compiz and play around with the 3D effect. Totally working fine!

Compiz banzai ~~~
More screenshots:-
Cube Reflection and Deformation effect

Water effect

p/s: Now Compiz can support more than 4 desktops. See my 3D desktop becomes pentagon if I have 5 desktops... cool .... :D ~

Saturday, August 16, 2008
Communicate with my Windows
1. Remote Desktop
I have a old PC running Windows 2000. Currently I only have one monitor. (No budget for another monitor now. :P) So I download and install tightVNC for my old PC. OK, problem now. What program should I use in Ubuntu? (I am still a noob in Ubuntu)... Luckily a friend told me that the Remote Desktop Viewer in Ubuntu is VNC. It is located at Applications->Internet. OOO yes it works!

2. File Sharing
Now I need to do file sharing between these two PCs. First I need samba. Samba can be install using the Applications->Add/Remove. Beware there are few samba applications. Don't install all. It will crash and you will confuse yourself. I only installed the most common one called "Samba"... After installed, it will appear at System->Administration. It looks like this:-
 I had create a share foders with read/write permission for everyone.
 Then I test to copy file from my Win2k to this Ubuntu share, it works!
So far so good. :D
Friday, August 15, 2008
Partition scheme
I believe most of the Windows users like to partition their hard drive. The reason of doing partition is very simple,
Ubuntu is a Linux operating system which using Ext3 (Third Extended) file system. Unlike Windows file system (NTFS/FAT), there is no such "Drive C", "Drive D" in Ubuntu. Linux file systems just like Unix, is organized in a hierarchical, tree-like structure. The highest level of the file system is the
Another question is "Is it necessary to do partition for Ubuntu?". Well, if you want to do a dual-boot (Windows and Ubuntu) in a single hard drive, definitely YES. How about if no dual-boot? Well, I had done some researches about the fragmentation issue. The result I get is "Unix/Linux file system don't become fragmented the way FAT/NTFS file systems do. Most of the modern Unix/Linux file systems attempt to fragmentation at a minimum, thought they do this in various ways. The Ext3 file systems keep all blocks in a file close together by preallocating the disk data blocks to regular files before they are actually used. When a file increases in size, several adjacent blocks are already reserved, reducing the file fragmentation." Sound cool!
So, whether to partition or not is not a big deal at all if the Ubuntu is just for personal used. But I decided to do partition for one main reason. Separate my data files from the system/program files partition just like the way I did for my Windows. After some researches and studies, I found out that planning the partition is really interesting. First of all, you should think about what you are going to use your Ubuntu for. For me, I am a programmer, I need to use Apache, MySQL, php. I also play games, downloading and sometimes photo editing. So, I do my partition like this:-
 First of all, the system and program files partition (/). I allocated around 40GB for it. Then the database and log files (/var) will be in another partition. It wont consume too much space for myself used, around 20GB will be enough. Linux need a swap partition. Swap is equal to Windows virtual memory. Normally 512MB~2GB is good enough. The rest will be my home directories (/home) that keeps my downloaded stuff, picture video... etc will be another partition (around 90GB). Have you notice there are few more standard directories such as /boot /usr? Well, don't worry, there all will be automatic place in the first primary partition (/).
Actually this is not a perfect partition scheme. It is just a basic guide. I will keep research and testing now. When version 8.10 released, I will reformat my PC. :P
ADDITIONAL(16 Aug 2008):
I found guide saying that swap partition is better place it in the middle. So that the heads have less far to travel to swap out data when system gets loaded. Good idea! I will do it that way next time.
- hard disk size too big. Defragmentation will take long time if the size is too big.
- easy to manage. Normally we keep our data files in different partition. When reformat and reinstall Windows, we won't waste too much time to backup/transfer our data files.
Ubuntu is a Linux operating system which using Ext3 (Third Extended) file system. Unlike Windows file system (NTFS/FAT), there is no such "Drive C", "Drive D" in Ubuntu. Linux file systems just like Unix, is organized in a hierarchical, tree-like structure. The highest level of the file system is the
/ or root directory. The common directories are:-- / - Root file system. Should just contain /bin, /sbin, /dev, /root, /lib, and /etc.
- /boot - files that are required to boot; boot kernels.
- /usr - applications and files including source code that are mostly available for all users to access.
- /var - Variable data such as spools, logs, news and mail queues, database data.
- /home - local users' home directories (like My Documents in Windows)
- /tmp - temporary files
Another question is "Is it necessary to do partition for Ubuntu?". Well, if you want to do a dual-boot (Windows and Ubuntu) in a single hard drive, definitely YES. How about if no dual-boot? Well, I had done some researches about the fragmentation issue. The result I get is "Unix/Linux file system don't become fragmented the way FAT/NTFS file systems do. Most of the modern Unix/Linux file systems attempt to fragmentation at a minimum, thought they do this in various ways. The Ext3 file systems keep all blocks in a file close together by preallocating the disk data blocks to regular files before they are actually used. When a file increases in size, several adjacent blocks are already reserved, reducing the file fragmentation." Sound cool!
So, whether to partition or not is not a big deal at all if the Ubuntu is just for personal used. But I decided to do partition for one main reason. Separate my data files from the system/program files partition just like the way I did for my Windows. After some researches and studies, I found out that planning the partition is really interesting. First of all, you should think about what you are going to use your Ubuntu for. For me, I am a programmer, I need to use Apache, MySQL, php. I also play games, downloading and sometimes photo editing. So, I do my partition like this:-
 First of all, the system and program files partition (/). I allocated around 40GB for it. Then the database and log files (/var) will be in another partition. It wont consume too much space for myself used, around 20GB will be enough. Linux need a swap partition. Swap is equal to Windows virtual memory. Normally 512MB~2GB is good enough. The rest will be my home directories (/home) that keeps my downloaded stuff, picture video... etc will be another partition (around 90GB). Have you notice there are few more standard directories such as /boot /usr? Well, don't worry, there all will be automatic place in the first primary partition (/).
Actually this is not a perfect partition scheme. It is just a basic guide. I will keep research and testing now. When version 8.10 released, I will reformat my PC. :P
ADDITIONAL(16 Aug 2008):
I found guide saying that swap partition is better place it in the middle. So that the heads have less far to travel to swap out data when system gets loaded. Good idea! I will do it that way next time.
Thursday, August 14, 2008
NVidia 8500GT not support!
I successfully installed my Ubuntu but NVidia 8500GT display driver not support! ARH~~~
To check the drivers, go to System->Administration->Hardware Drivers. It will shows something like this:-
 My NVidia accelerated graphics driver is "Not in use". When i clicked the "Enabled" check box, it shows this:-
 The message showing that accelerated graphics driver is required for fully utilize the 3D potential of the NVidia graphics card. When i enable it, it will do an online update and ... it seen like successfully but after i restart my PC, my screen turn up in low-resolution mode, a maximum of 640 x 480!!! Before update the driver my resolution is 1280x800.
I had tried the automatic update, manual install the driver downloaded from NVidia website or even Envy, but all fail!
I tried to check from the website, many people having this problem. Then I tried to search for the list of the graphic cards that support for Ubuntu 8.04. Seen like it only support up to NVidia 8400GS or ATI x1300. So, before you buy your hardware, make sure to check the hardware support list first. The list can be found in here: https://wiki.ubuntu.com/HardwareSupport/ And, before install the Ubuntu, you can always do a "Hardware Test" first. I failed the video test when doing the hardware test, but I still installed it hopefully the auto update can solve this problem, but it failed too. :(
Other than the display driver, the rest is working fine. But without the correct display driver, I can't play 3D, no game, no compiz (3D effect desktop) .... There are few solutions for me right now,
Hopefully the newer version solved this problem.......
To check the drivers, go to System->Administration->Hardware Drivers. It will shows something like this:-
 My NVidia accelerated graphics driver is "Not in use". When i clicked the "Enabled" check box, it shows this:-
 The message showing that accelerated graphics driver is required for fully utilize the 3D potential of the NVidia graphics card. When i enable it, it will do an online update and ... it seen like successfully but after i restart my PC, my screen turn up in low-resolution mode, a maximum of 640 x 480!!! Before update the driver my resolution is 1280x800.
I had tried the automatic update, manual install the driver downloaded from NVidia website or even Envy, but all fail!
I tried to check from the website, many people having this problem. Then I tried to search for the list of the graphic cards that support for Ubuntu 8.04. Seen like it only support up to NVidia 8400GS or ATI x1300. So, before you buy your hardware, make sure to check the hardware support list first. The list can be found in here: https://wiki.ubuntu.com/HardwareSupport/ And, before install the Ubuntu, you can always do a "Hardware Test" first. I failed the video test when doing the hardware test, but I still installed it hopefully the auto update can solve this problem, but it failed too. :(
Other than the display driver, the rest is working fine. But without the correct display driver, I can't play 3D, no game, no compiz (3D effect desktop) .... There are few solutions for me right now,
- change my display card
- wait for new driver/solution/patch
- wait for Ubuntu 8.10 (will be release on October)
Hopefully the newer version solved this problem.......
Installing Ubuntu...
The version I am using is 8.04 (Hardy Heron). It can be downloaded from the Ubuntu website. Before you start install Ubuntu, please take note of its code name. My first experience with Ubuntu 7.04 (Feisty Fawn), when I try to search the packages from the website, I was confusing with the code name because Ubuntu package website using code name, such as:-
>> Ubuntu >> Packages >> feisty >> Index
But when you get use to it, it's quite simple. First, go to the main page: http://packages.ubuntu.com/ it will shows the code name and the version.
Here is list of the version and code name of the newer release (from 2007):
7.04 - Feisty Fawn
7.10 - Gutsy Gibbon
8.04 - Hardy Heron
8.10 - Intrepid Ibex (currently is alpha version, will be release on October 2008)
You can also check the code name from here: https://wiki.ubuntu.com/DevelopmentCodeNames for further updates.
Ubuntu has desktop and server edition. The different is server edition is without GUI (X server)
Well, just download and iso file (x86 or 64bit AMD architecture depending on your hardware)
and make a Ubuntu CD.
Installing Ubuntu Hardy is much more easier than the previous version. First choose the language, and then a menu will appear. You can either select "Try Ubuntu without any change to you computer" or "Install Ubuntu". I prefer the first option because I can test my hardware first before install.
Once inside Ubuntu, launch the Partition Editor located at System->Administrator. After the scanning process it will shows all the harddisk in your system. If nothing appear, meaning your harddisk is not support or maybe spoil. But there is another special case. The SATAII harddisk! SATAII harddisk normally not detect by Ubuntu! My friend first time install the Ubuntu got this problem. The way he solved this is very weird. He formatted the SATAII harddisk with NTFS, then it was detected by Ubuntu. I also got this problem too. I tried his method, not working. Then I search from the website, wow!... So many people facing this problem. Amazing... none of the expert can give a good answer! Finally I found 1... a guy said set the SATA mode to AHCI in CMOS. OMG~ It works!! As I know, not all the BIOS has this setting. I read my motherboard manual, AHCI (Advanced Host Controller Interface) mode is an interface specification that allows the storage driver to enable advanced Serial ATA features such as Native Command Queuing and hot plug. Well, I not really understand what it meant. Whatever, as long as my harddisk can be detected by Ubuntu.
If harddisk done, now try to test your network. This is important! A lot of thing you can't do without the networking. Network settings can be found in System->Administration->Networking. I am using a wired connection with static IP.

Next, click on the DNS tab, and add the DNS IP address.

After setting all the IPs, just close it. Then launch the Terminal located at Applications->Accessories and try to ping the gateway IP or any valid URL such as google.com. It works, meaning my network card is OK. So simple just like Windows. :D (I believe everyone know how to do a ping, just type ping google.com then press enter)
Now I do the Hardware Test (System->Administration->Hardware Testing).
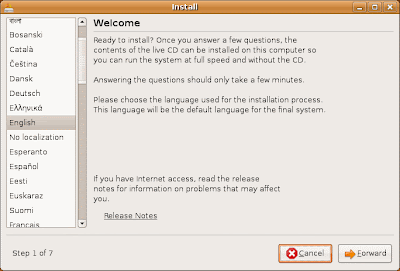
Everything passed, except the video... I see nothing... Never mind, I will try to solve this after the installation as long as my network is working. To install just simply double-click the Install icon on the top-left side. The installation is pretty simple, only 6 steps. First select the language.
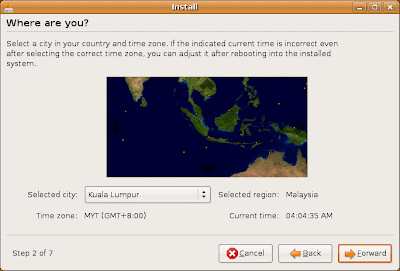
Then select the time zone. You can direct point at map, it can be zone in and out, move left or right.
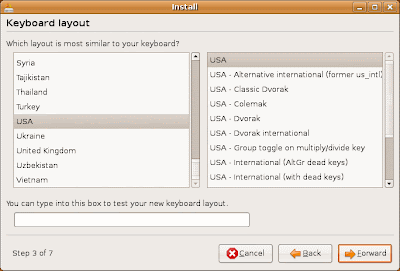
Then the Keyboard layout.
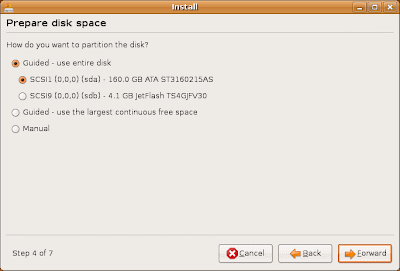
After that is partitioning time. The simplest way is just use the default setting "Guided - use Entire disk". Linux file system unlike NTFS or FAT, you will never see Drive A:\ C:\ D:\ ... and no need to do defragmentation. But if you want to do dual boot with Windows or partitioning the Linux directories, then you must select "Manual". I do it manually but I will write it in another topic called "Partition scheme".
Who are you? Type your name (for display) , the log-in name and password. And the name of your computer.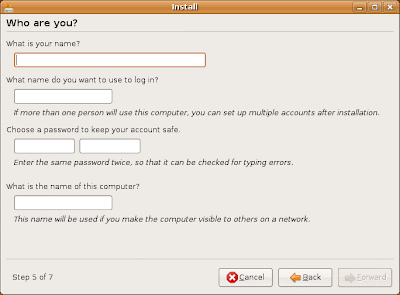
Ready to install. Is everything Ok, then just click Install. When finishing installed, a pop-up window will appear, saying that the "Installation is complete. You need to restart the computer in order to use the new installation.". Just click Restart now.
DONE! ~ yea ~ Ubuntu~
>> Ubuntu >> Packages >> feisty >> Index
But when you get use to it, it's quite simple. First, go to the main page: http://packages.ubuntu.com/ it will shows the code name and the version.
Here is list of the version and code name of the newer release (from 2007):
7.04 - Feisty Fawn
7.10 - Gutsy Gibbon
8.04 - Hardy Heron
8.10 - Intrepid Ibex (currently is alpha version, will be release on October 2008)
You can also check the code name from here: https://wiki.ubuntu.com/DevelopmentCodeNames for further updates.
Ubuntu has desktop and server edition. The different is server edition is without GUI (X server)
Well, just download and iso file (x86 or 64bit AMD architecture depending on your hardware)
and make a Ubuntu CD.
Installing Ubuntu Hardy is much more easier than the previous version. First choose the language, and then a menu will appear. You can either select "Try Ubuntu without any change to you computer" or "Install Ubuntu". I prefer the first option because I can test my hardware first before install.
Once inside Ubuntu, launch the Partition Editor located at System->Administrator. After the scanning process it will shows all the harddisk in your system. If nothing appear, meaning your harddisk is not support or maybe spoil. But there is another special case. The SATAII harddisk! SATAII harddisk normally not detect by Ubuntu! My friend first time install the Ubuntu got this problem. The way he solved this is very weird. He formatted the SATAII harddisk with NTFS, then it was detected by Ubuntu. I also got this problem too. I tried his method, not working. Then I search from the website, wow!... So many people facing this problem. Amazing... none of the expert can give a good answer! Finally I found 1... a guy said set the SATA mode to AHCI in CMOS. OMG~ It works!! As I know, not all the BIOS has this setting. I read my motherboard manual, AHCI (Advanced Host Controller Interface) mode is an interface specification that allows the storage driver to enable advanced Serial ATA features such as Native Command Queuing and hot plug. Well, I not really understand what it meant. Whatever, as long as my harddisk can be detected by Ubuntu.
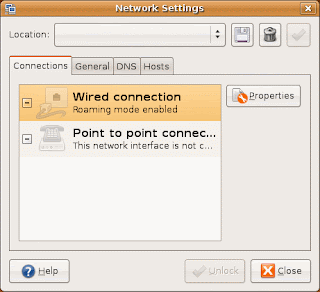
If harddisk done, now try to test your network. This is important! A lot of thing you can't do without the networking. Network settings can be found in System->Administration->Networking. I am using a wired connection with static IP.
Select the Wired connection and click Properties.

Un-tick the "Enable roaming mode", then select Static IP address.
Fill in the IP address then click OK
Fill in the IP address then click OK

Next, click on the DNS tab, and add the DNS IP address.

Now I do the Hardware Test (System->Administration->Hardware Testing).

Everything passed, except the video... I see nothing... Never mind, I will try to solve this after the installation as long as my network is working. To install just simply double-click the Install icon on the top-left side.
 The installation is pretty simple, only 6 steps. First select the language.
Then select the time zone. You can direct point at map, it can be zone in and out, move left or right.

Then the Keyboard layout.

After that is partitioning time. The simplest way is just use the default setting "Guided - use Entire disk". Linux file system unlike NTFS or FAT, you will never see Drive A:\ C:\ D:\ ... and no need to do defragmentation. But if you want to do dual boot with Windows or partitioning the Linux directories, then you must select "Manual". I do it manually but I will write it in another topic called "Partition scheme".

Who are you? Type your name (for display) , the log-in name and password. And the name of your computer.

Ready to install. Is everything Ok, then just click Install.
 When finishing installed, a pop-up window will appear, saying that the "Installation is complete. You need to restart the computer in order to use the new installation.". Just click Restart now.
DONE! ~ yea ~ Ubuntu~
Subscribe to:
Posts (Atom)

