Monday, January 19, 2009

First GUI "Hello World!" using Python

This is exciting!! I always want to learn how to program a GUI application for Linux (GNOME). Finally I made it!

There are many programming language can do a GUI application for Linux. I myself is a Web application programming using ASP and PHP. Sometimes I also program application for Windows using Delphi. The reason I use Python is simply because it is pre-installed. :P~ And lot of people saying that program Python using Glade is very simple and fast especially the graphical interface.

Lets try a simply one first. Open the terminal, and type gedit helloworld.py. Copy and paste the codes below:-

#!/usr/bin/python

import pygtk
pygtk.require('2.0')
import gtk

class Whc:
def __init__(self):
self.window = gtk.Window(gtk.WINDOW_TOPLEVEL)
self.window.connect("destroy", self.destroy)
self.window.set_title("Hello World!")
self.window.set_default_size(200,100);

self.label = gtk.Label("Hello World!")
self.window.add(self.label)
self.label.show()
self.window.show()

def destroy(self, widget, data=None):
gtk.main_quit()

def main(self):
gtk.main()

if __name__ == "__main__":
base = Whc()
base.main()

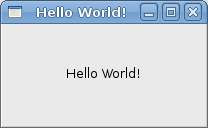
Save and close it. Then type python helloworld.py and a window with the word "Hello World!" will appear on the top left side of your desktop.


You can also make it become self executable. Just change its mode using chmod command: sudo chmod +x helloworld.py

Then you can type ./helloworld.py to run it.

Python also allows you to compile it into Bytecode (.pyc). Just type python in the terminal and press enter. At the >>> prompt, type the codes below line by line:-

import compiler

compiler.compileFile("helloworld.py")

exit()


Then a file called helloworld.pyc will be generated. Change its mode to executable:

sudo chmod +x helloworld.pyc

and you can run it directly now:

./helloworld.pyc
.


You can also create a simple compiler yourself that can save a lot of time typing the codes in Python everytime. Create a file called pycompiler.py and paste the codes below:-

#!/usr/bin/python

import sys
import compiler

compiler.compileFile(sys.argv[1])


Immediately use it to compile itself:-

python pycompiler.py pycompiler.py

And change it to executable mode.

sudo chmod +x pycompiler.pyc

Next time you can use it to compile the .py file, the usage is:

./pycompiler.pyc FILE...

:)~


Additional links:

GNOME information @ wikipedia
GTK information @ wikipedia
PHP-GTK information @ wikipedia

Tutorial video of Building a GUI applications with Python, GTK and Glade

Monday, January 12, 2009

Remote Desktops Client

There is a pre-installed program called Terminal Server Client similar like the Remote Desktop Client in Windows. This is how it looks like:-

It support RDPv5 (Windows XP and newer version) and RDP (Windows 2000 and older version) protocol. Easy to use.

Tuesday, January 6, 2009

DVD Ripper

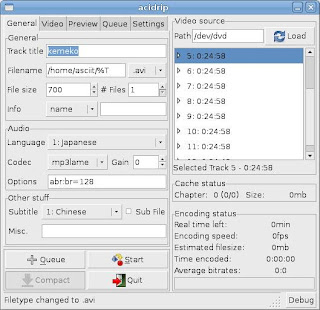
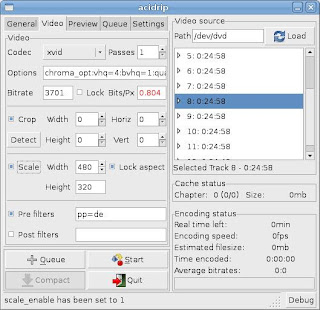
I like AcidRip. It is very easy to use and the outcome is good! :) It can be install from package manager, look for AcidRip DVD Ripper. So here is it:-


First, clicked the Load button. Then the track list will be shown.

In the general tab, you can set the video(avi/mpg) and sound(copy/pcm/mp3lame/lavc/twolame/faac) format, language and subtitle.


In the Video tab, you can set the video codec (copy/raw/nuv/lavc/libdv/xvid/x264), Crop (Widht/Heigt) and Scale (Widht/Heigt).

For those who not familiar in DVD Ripper, video and audio codec, here is the tips:-

General:
Filename Extension: .avi

Audio:
Audio Codec: mp3lame

Video:
Video Codec: xvid
Crop: no (un-tick)
Scale: no (un-tick)

The rest just use default setting. Select the track and click Start.

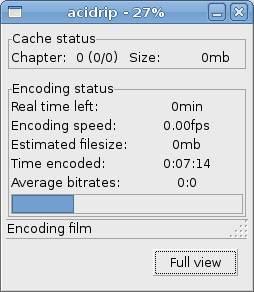
Tips #2: If you feel that the Video quality is not good, you can change the bitrate in the video tab. Audio bitrate can be change in the General tab - Audio Option: br=128. To cancel the ripping process, click on the Full view button, and then click the Stop button.


Saturday, January 3, 2009

Sound Convertor

I got a friend asked me if I can convert the Ogg format to MP3. So I opened the Package Manager, search the keyword Ogg. I found an application called OggConvert, without reading the long description, I installed it.

Then I found out that I make a mistake, this application actually converting other sound format to Ogg format. Anyway, it's very light, simple and easy to use. Here is how it looks like:-


When I clicked on the Advanced option, it only can convert to Ogg and Matroska format.

Alright, time to find another converter. By using the same keyword, I found an application called Sound Converter. Oh~ why can't I see it in the first place? Because the OggConvert is on top of it. haha.


So this is Sound Converter. Looks very simple too. But when I opened the Preferences, I notice that the MP3 radio button is not active. And I saw this words: "See this howto to enable mp3 encoding" at the bottom. So just click the howto, and then click the Ubuntu 7.10 and more... it will start install the GStreamer MP3 Encoding.


Finally restart the Sound Converter. Yes, can select MP3 now.

Friday, January 2, 2009

New Author!

Yep~ this blog has a new author now.

Let's welcome ultrasong.


He is one of my friends who doing networking (mostly in Windows platform).

He is major in network security (Router, firewall, anti-virus.... etc).

He is good in Chinese (can find lot information from Chinese website).

He is good in gaming (always kill me in dota :\ ).

And the most important thing is... he want to learn Linux now, so immediately I invite him into my blog. My Ubuntu gang getting bigger and bigger now. :D yea~~~~~~~~~~~~

blankblankblankblankblankblbelated
Wishing all of you a Happy ^ New Year. :)~

Sunday, December 28, 2008

VMWare arrow keys problem

I found some problems with arrow keys, insert/delete, pg up/pg down and home/end keys with vmware 6.5. When I press these keys, my Windows opens the Start Menu. So I always have to use the keypad's arrow keys. -_-..

Actually the solution is very simply, close the vmware and create a config file in ~/.vmware directory (gedit ~/.vmware/config)

and add this:-

xkeymap.keycode.108 = 0x138 # Alt_R
xkeymap.keycode.106 = 0x135 # KP_Divide
xkeymap.keycode.104 = 0x11c # KP_Enter
xkeymap.keycode.111 = 0x148 # Up
xkeymap.keycode.116 = 0x150 # Down
xkeymap.keycode.113 = 0x14b # Left
xkeymap.keycode.114 = 0x14d # Right
xkeymap.keycode.105 = 0x11d # Control_R
xkeymap.keycode.118 = 0x152 # Insert
xkeymap.keycode.119 = 0x153 # Delete
xkeymap.keycode.110 = 0x147 # Home
xkeymap.keycode.115 = 0x14f # End
xkeymap.keycode.112 = 0x149 # Prior
xkeymap.keycode.117 = 0x151 # Next
xkeymap.keycode.78 = 0x46 # Scroll_Lock
xkeymap.keycode.127 = 0x100 # Pause
xkeymap.keycode.133 = 0x15b # Meta_L
xkeymap.keycode.134 = 0x15c # Meta_R
xkeymap.keycode.135 = 0x15d # Menu

Friday, December 26, 2008

Reinstall Ubuntu...

My Ubuntu having big trouble! CPU usage too high... totally don't know what happen. The system monitor showing the CPU usages very high... 50%~100%. After rebooting few time, eventhough my system is apparently idle (only running the system monitor) the CPU usage still very high. The Compiz effect is lagging (switching the 3D desktop). Strange thing is all the processes showing in system monitor is very low. Totally can't find any process that cause this problem.

Okay... let me recall what had I done...

1. Install MPlayer and its codec.
2. Installed Compiz fusion Icon.
3. Installed Apache2, MySQL and php.
4. Live update via Update Manager.
5. Installed VirtualBox and modify the /etc/init.d/mountdevsubfs.sh

Everything seen fine for me. I don't think these applications or services were too heavy for my quad core processor. Could it be the updates crashed with something? Really no idea.

It's time to find the answer from the www. Surprisingly there are some report of this bugs (Try google with the keyword "ubuntu cpu usage"). After reading few article, I learnt something new... Zombie Process! OMG... my system got zombie!!!

What is the zombie process? Go read the wikipedia... http://en.wikipedia.org/wiki/Zombie_process

How to see the zombie? The simple way is use the top command in the terminal.


Notice the second line, "Tasks: 165 total, .... ... ... ... 1 zombie". To find that zombie process, just run the system monitor, click on the Processes tab and look for "Zombie" in the status column. The other way is the command "ps aux" in the terminal.

Anyway, I still don't know how to solve the high load problem. So I decided to reinstall my Ubuntu. Then monitor the CPU usage each time I install an application or update.


OK, just after the installation, without any updating, seen fine, although the CPU4 showing 46.7% but I think its normal.

Then I tried to install Compiz and I moved the "Add/Remove Application" window around while installing.


OMG, see that graph of the CPU History? A downloading process plus moving window task only... I really don't understand why so heavy load? hmm... Never mind, just continue the updating... after everything done (all the updates including NVidia driver and Compiz), I restart the Ubuntu. And here is the result:-


Seen OK. All Compiz effect very smooth. Well... I guess this CPU high load problem need some time to figure out. Ubuntu (linux) is still like an alien to me. ):=|

EDIT: I just found a program that will cause the 100% CPU usage problem! The openOffice!!! Just after I published this article, I closed the openOffice and immediately I switched to another desktop and closed the GIMP. And bingo, guess what, 100% CPU usage:-


System monitor shows that 4 CPU 100%, top shows that 99.6%us, soffice.bin: 392%. But strange thing is the Compiz still running smoothly!? Anyway, this problem I still can solve it, just kill the soffice.bin process. Then CPU back to normal again.


Conclusion, need more time to understand this alien.